

'밥벌이'에 해당되는 글 30건
- 2008.12.16
- 2008.12.15
- 2008.12.11
- 2008.12.08
- 2008.11.13
- 2008.10.29
- 2008.10.16
- 2008.05.19
- 2007.11.19
- 2007.10.12
This document describes how to set up your local work environment, how to use Repo to get the Android files, and how to build the files on your machine. Related reading:
What's in the source?
For a description of all the projects that make up the Android source code, see Project layout. To see snapshots and histories of the files available in the public Android repositories, visit theGitWeb web interface.
The source is approximentely 2.1GB in size. You will need 6GB free to complete the build.
Setting up your machine
To build the Android source files, you will need to use Linux or Mac OS. Building under Windows is not currently supported.
LinuxThe Android build is routinely tested on recent versions of Ubuntu (6.06 and later), but reports of successes or failures on other distributions are welcome.Ubuntu Linux (i386)
To set up your Linux development environment, make sure you have the following:
$ sudo apt-get install git-core gnupg
$ sudo apt-get install sun-java6-jdk
$ sudo apt-get install flex bison gperf libsdl-dev libesd0-dev libwxgtk2.6-dev build-essential zipcurl libncurses5-dev zlib1g-dev
$ sudo apt-get install valgrind Ubuntu Linux (amd64)This has not been as well tested. Please send success or failure reports to repo-discuss@googlegroups.com.
The Android build requires a 32-bit build environment as well as some other tools:
$ sudo apt-get install git-core gnupg flex bison gperf build-essential zip curl
Ubuntu doesn't have packages for the X11 libraries, but that can be worked around with the following command:
$ sudo ln -s /usr/lib32/libX11.so.6 /usr/lib32/libX11.so
Other LinuxThere's no reason why Android cannot be built on non-Ubuntu systems. Please send any success or failure reports to repo-discuss@googlegroups.com. In general you will need:
Anything missing from this list? Please let us know! |

So after some unsuccessful attempts at updating OS X I finally got the 10.5.5 update to install and not trash the Mac hard drive. I am not going to write instruction how to do it because the problem it seems is that depending on your build, depending on what hardware, depending on the kernal and version of OS X (Kalyway, iDeneb, Jas, Etc) that there are so many variables involved that there is no sure fire way of doing this without trial and error. I had to reinstall OS X multiple times before I found the method for my machine that worked.
The following are some tips and notes from my update process:
Updating from 10.5.2 to 10.5.3
-I am using the Kalyway 10.5.2 and updating to 10.5.3 is very easy. Search and DL the10.5.3 Kalyway Combo Update, it comes with the 9.3 Vanilla Kernel update as well. I would dare say that even if you are not using the Kalyway version that this update would still work on your build.
Updating from 10.5.3 to 10.5.4
-This was even easier that the previous update. Here all I did was install the 10.5.4 Delta Update which I downloaded via Bit Torrent. Once downloaded run the installer, let it finish, restart with the “update -v” command at boot.
-Some people are saying the the Apple Update program works as well to update to 10.5.4. I would say to try this at your own risk. It does not work for every build, and for my build I got kernel panics and a trashed Mac partition when attempting this. Again, it all depends on the variables. If you are brave then try the Apple Updater first and see if it works, otherwise go the Delta route and do it manually.
Updating from 10.5.4 to 10.5.5
-This was not easy. I had the most trouble trying to get this to work.
-Same as before, manually download the 10.5.5 Delta Update via Bit Torrent
-Run the installer package
-During the install process quickly navigate to /System/Library/Extensions/
-Watch for the AppleIntelCPUPowerManagement.kext to appear, move it to trash immediately
-Now at about the 88% progress of the installer the system will crash, show a kernel panic that the system needs to restart. (Yeah I was worried as well that I would have to reinstall everything again)
-Reboot machine, boot to safe mode first (”-x -v” command at boot)
-If machine successfully boots to safe mode then you should be OK to reboot and start-up as normal.
-Verify 10.5.5 update works by going to the “About this Mac”
-Lastly, check in /System/Library/Extensions/ for “Dont Steal Mac OS X.kext”
-If this exists then rename it to “DSMOS.ktext”
I used a number of sources and experimented with different ways of doing this update. Here are some of my sources, but be careful because ultimately you will need to figure out what the best method to update for your machine is.
-http://cocoatree.wordpress.com/2008/07/21/how-to-update-kalyway-1051-to-1054/
-http://netkas.org/?p=50
Good luck with your update process, share your experiences and tell me what worked or didn’t for you.
링크 수정했습니다.
가끔 설치가 안된다고 말씀하시는 분들이 있어서 개발환경 설정 및 에뮬레이터 실행방법을 올립니다.
이클립스 3.5 기준입니다.
안드로이드 개발 환경 구성하기 (http://developer.android.com/sdk/installing.html)
설치가 모두 완료되었습니다. 새로운 프로젝트를 한번 만들어볼까요?
에뮬레이터가 실행되며 Hello World를 표시한 어플리케이션이 실행됩니다.
수고하셨습니다.
(옵션) 서버 이상으로 ADT 플러그인이 설치되지 않을 경우
(옵션) 이클립스 한글화 시키기
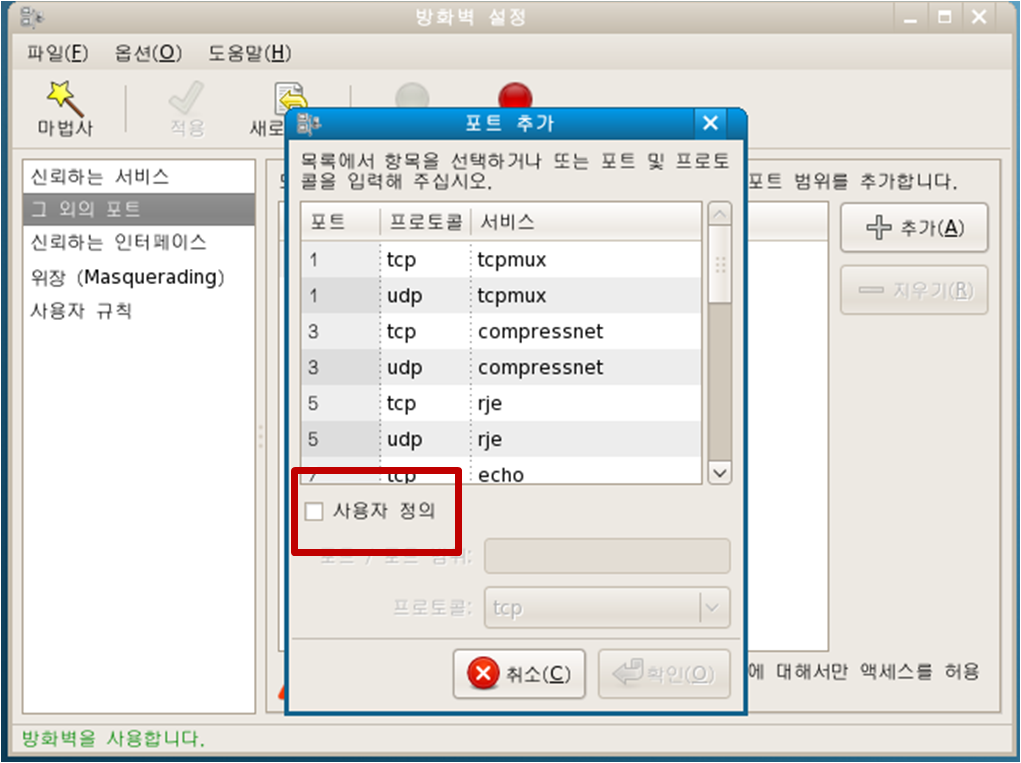
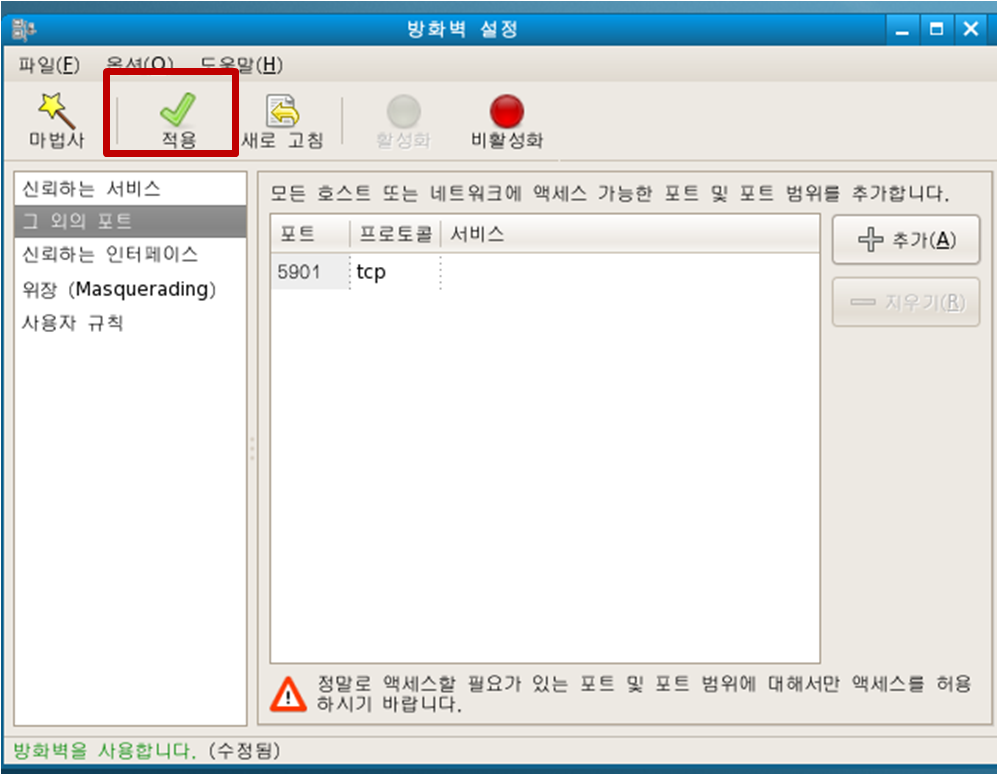
1. 일단 vncserver를 설치 한다.
# yum install vnc-server2. 우리가 건드려야 할 파일은 다음과 같다.
/etc/sysconfig/vncservers3.root 밑에 .vnc 디렉토리를 생성한다먼저 첫번째 파일은 수정한다.
#vi /etc/sysconfig/vncservers
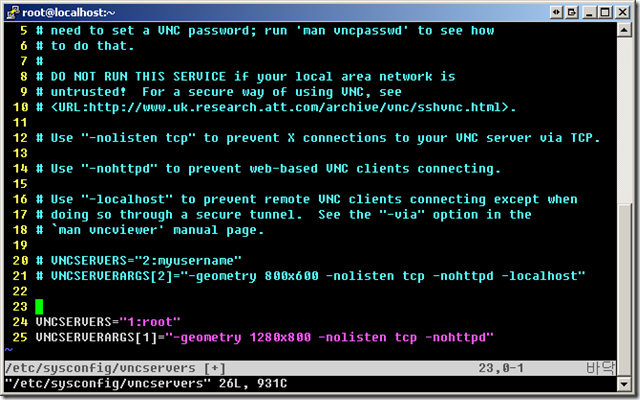
다음과 같은 화면을 볼 수 있다.
- 첫번째 VNCSERVERS="1:root" 란 Display 번호를 매기는 것이다.
- 두번째 VNCSERVERARGS[1]="-geometry 1280x800 -nolisten tcp -nohttpd"
설정을 통해 해상도와 연결방식에 대해 설정한다.
4. Password를 정한다.
# vncpasswd5. X를 띄우자!
윈도우나 리눅스에서 vncserver 에 접속을 하게되면 회색 화면만 볼 수 있다.
이걸로 해서는 결국 ssh접속이나 다를바 없다.(사실 더 불편하다.)
# vi ~/.vnc/xstartup

다음과 같은 화면을 볼 수 있다.
5,6 번째 줄의 주석을 제거하여
unset SESSION_MANAGER
exec /etc/X11/xinit/xinitrc
가 작동하도록 하자.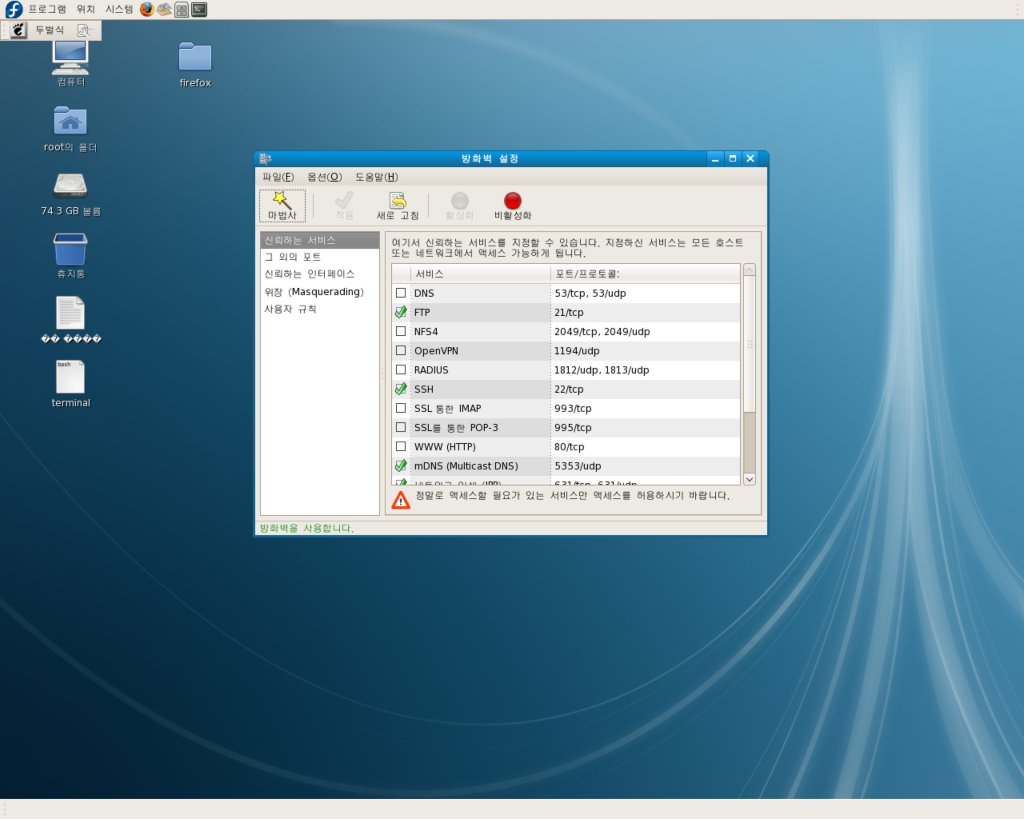
7. vncserver를 띄운다.
띄우는 방법은 보통 2가지가 있다.
# vncserver :1
# service vncserver start
위에 방식은 1024x768 고정 사이즈로만 나온다.
아래 방식은 설정한 해상도로 나온다.
8. 다음과 같은 화면을 볼 수 있다.~!
vncviewer를 이용하여
IP주소:1 (1은 /etc/sysconfig/vncservers 에서 설정한 Display Number)

위의 화면은 모니터 + 노트북 으로 듀얼로 구성된 상태이다.
----------------------------------------------------------
SOFTWARE CODECS:
---------------------


|


 invalid-file
 PREV
PREV